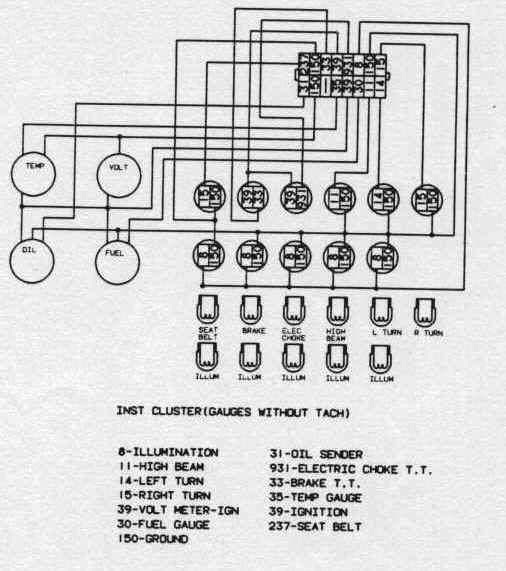
11 = Light green
14 = Light blue
15 = Dark blue
39 = Pink-Black
30 = Pink
150 = Black
31 = Tan
33 = Tan-White
35 = Dark green ( hot )
237 = Yellow
"Van Gauge's" into Chevette
Scott has provided a helpful schematic for those who would like to install the Chevy Van gage cluster into their Chevette.
|
8 = Gray- instrument
lights 11 = Light green 14 = Light blue 15 = Dark blue 39 = Pink-Black 30 = Pink 150 = Black 31 = Tan 33 = Tan-White 35 = Dark green ( hot ) 237 = Yellow |
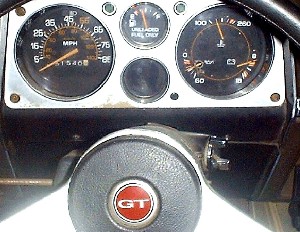 Photo
supplied of Alex Quirk's Chevette.
Photo
supplied of Alex Quirk's Chevette.
Scott writes:
All right, here it goes...
I've had many Chevettes in the past because the are great cars, and
when they aren't so reliable they are easy and cheep to fix and parts
are everywhere. The only down side of these and many other vehicles,
in my opinion, is the lack of operating information presented to the
driver. When I am driving I like to know what it going on with my
engine. This is more important when towing or driving long distances
in older vehicles.
Being that Chevettes are cheep (as in the cost of one), some people
don't take care of them so you don't always know what you are buying.
If only there was a way to see what the engine is doing when you are
driving it... I never knew that the Chevy Van gauges are exactly the
same dimensions as the Chevette gauges until I started researching
about putting a 2.8L into a Chevette. Somewhere on the net (it was
your page Bob) I found a photo of a guy (Alex Quirk aka AJQ) who put
the gauges in his Chevette. I contacted Alex and found out it was a
very easy swap.
This procedure assumes you know how to use a screwdriver and other such
tools. Some understanding of schematics/electronics and trouble
shooting are also an asset but not really required. Please note that I
am using a 2.8L MPFI in my Chevette and do not have to worry about the
choke lead from the oil pressure sending unit. Therefore I will have
figure out the best way of doing this, but I have included the way that
was mentioned on the forum. I should also mention that I take no
responsibility in what you do to your car nor do I recommend doing it
if you are not confident in your abilities.
Step 1. Go to your favorite auto wreckers (or find a van you can steel
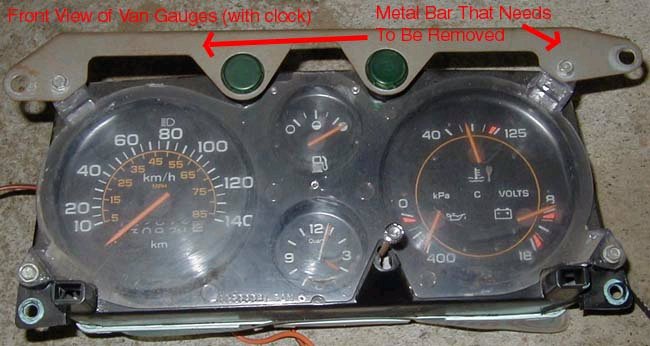
the gauges from) and find yourself a nice set of gauges from a 1979-90
(might be only to '89 though) with full instrumentation. I found two
different styles in the gauges, the differences were the fonts on the
lettering, the colour and length of the needles and some of the gas
gauges say "unleaded fuel only". Pick the gauges you like the look of
best and think will work! There was also a clock option (just like the
Chevettes) that goes in the bottom center hole on the cluster, grab
that if you can find it, it just runs to a battery connection on your
fuse block. You can also use your Chevette speedo if you want. You
will need to remove the metal bar on the top of the van cluster also,
it is just held on with some screws.
Step 2. Find a van gauge schematic, well if you are reading this you
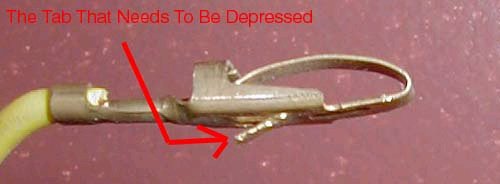
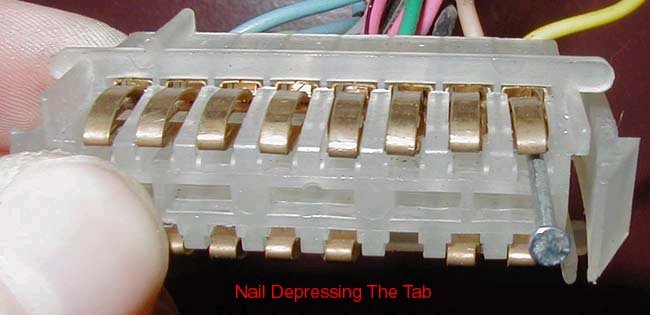
already have. Remove the Chevette gauges and remove the pins from the
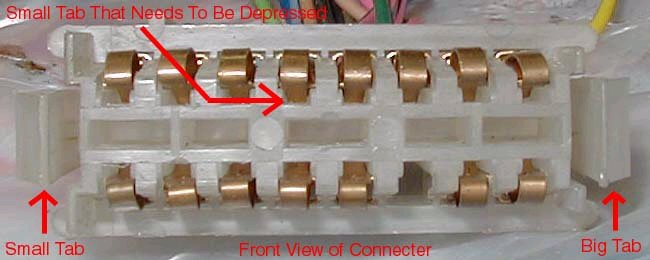
harness. To remove the pins you will need a small diameter nail or a
big sewing needle. Insert the nail into the end of the connecter that
plugs into the gauges in each hole where there is a wire. There is a
tab in there that keeps the wire from coming out of the connecter, you
will need to depress this tab and remove the wire from the back of the
connecter. If you bend the tab too much you can always bend it back
when the wire is out.
Step 3. Now you will need to print out the van schematic or take your
computer to the garage or where ever your Chevette is. It might be
good to print this whole page now that I think about it. Anyways, now
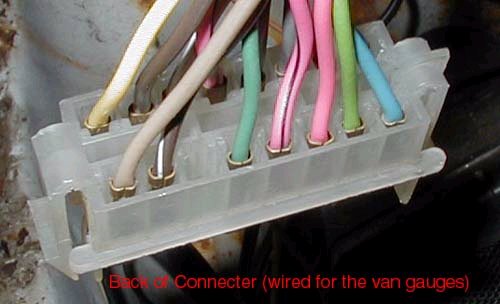
comes the fun part, inserting the wires in the connecter. Please
remember that the schematic is for the gauges and is viewed as you are
looking at the back of the instrument cluster.

Having said this you
will also need to remember that you should be looking at the BACK of
the connecter not the front as this will give you undesirable results.
Funny things will also happen if the connecter is upside down, please
take note of the tabs on the side of the connecter, there is a big one
and a little one, be sure to position it as shown in the schematic.
Follow the schematic and insert the wires into the harness, all the
wires are the same colour so it is very easy to do.
Step 4. It would be best to leave the cluster unplugged and change the
sending units now. According to Alex "You will need a higher pressure
oil sender from a HD Chevy truck 80psi versus standard 60psi..my
standard Chevette engine would 'peg' the gauge just off idle with the
60psi sender!" This is from the forum "The oil pressure sending unit
is located on block under the intake manifold, there should be a
connector with 3 or 4 wires coming out of it, it is located between the
coil and the starter". Alex also writes "I installed a (heavy
duty/thick wall-DON'T ASK WHY!) 'T' plumbing fitting on the side of the
block and used 'both' the original(oil press) switch and the oil
pressure sender so that I still had the Choke heater voltage feed..then
separated the 2 wires at the original switch connector... so that the
wiring could take the sender info to the cluster and the power feed
made it to the electric choke..
I did use a spare (socket) and bulb(and glued on a spare 'volts' label
from another cluster) on the cluster with a separate wire on the van
cluster to allow the GM alternator to operate correctly as it feeds
from the key through the bulb to the regulator so that it 'knows' when
the key is on..."
Here is part of an email from Alex which clears things up a little "and
dividing the current oil switch sender wires for the carb heater choke
and the oil light..as the oil light is currently wired to tell if the
carb heater choke opens up or disconnects from the circuit..it also
allows the oil pressure to turn on the heater choke so that a stopped
engine with the key on does not open the choke before the engine
starts..." Again I don't have a choke on my engine so I'll have to
figure out an English translation to what Alex said. If you understand
electronics/wiring this should be clear, but I assume some people are
shaking their heads at this.
Step 5. You will also have to change the stock Chevette temperature
sending unit (which is only a switch) to a true sending unit that
varies the resistance. I assume that you should be able to grab a
sending unit from any GM vehicle with a temp gauge, maybe use one from
a 4 banger because the operating temperatures will be closer. The
sending unit is at the front of the head under the camshaft belt cover.
Hopefully this step is clear, the 2.8 is different so I'm just going
off what I read.
Step 6. It should now be safe to plug the cluster harness into the
cluster and turn the key to run and only run, do not start the car yet.
Make sure that your signal lights, 4 way flashers, seatbelt light,
brake light, high beam light... all work on the gauges and that your
gauges respond. The gauges should move from their resting position
when the key is turned. If all that looks good then fire up the car
and things should work. If so, then mount your new cluster in the car
and take it for a spin. If not, double check your wiring and make sure
that you hooked up your sending units. If that still doesn't work then
it would be best to post your question on the forum.
After thoughts: I haven't fired up my Chevette to see if the gauges
actually work but I am confident that they will. I will send in more
photos when I get a chance of the harness and gauges and sending unit
locations. I also plan to re-draw the schematics and include a
Chevette schematic for interest.
Scott
And now, an "addition" from Gerry ( aka the pintoKING ) , a helpful Canadian !
In Canada, we switched to the metric system in 1977. That means
that for you
folks who are looking for Chevy van gauge clusters for our beloved Chevettes in Canada,
that
many of these came with the metric readings; ie: KiloPaskals instead of PSI for
oil pressure, and Celsius degrees instead of Fahrenheit degrees for water temperature. The
battery
readings are still in Volts, however.
However, I do not know when GM actually switched to the metric readings in its
vans. All I know for sure is that in 2000, I went to a junkyard and found 2 Chevy van
gauge
clusters with the "standard" gauge readings, and 2 others with the metric gauge
readings. So there are still a few
of these "standard" gauge clusters available here in Canada.
Also, on some Chevy/GMC vans, there was a trip-odometer option.
But I am almost sure that these were all "electronic speedometers", meaning that
there is no speedometer cable, only a "sensor" on the transmission tail-housing.
So for
those of you who want to have a trip-odometer in your Chevette, just be sure to pick the
sensor on the transmission tail-housing along with the wires/connectors for it. I am also
pretty much sure that the gauge cluster housing for these trip-odometers are unique,
so make sure to
pick the whole cluster for your swap. That is all I know about these trip-odometers, since
I've
not been able to disassemble one yet.
Gerry, from Canada
aka PintoKING
Vive le Ford PINTO!
(et aussi les Chevettes!)
( Thanks Gerry ! )