S-10 brakes on the front of a Chevette
Ed Werick is at it again with his latest Chevette "improvement".
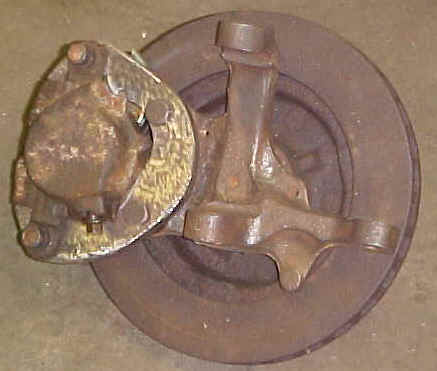
Hi Bob: I'm just about done with an S-10 front disc brake conversion. I borrowed a rotor and caliper and spent most of the weekend mounting them on a Chevette spindle. (pics) If you want to post it I'll send some detail pics and a write up. Ed
I've been seeing some requests for more info on the S-10 front brake swap so
I'll try to do a brief "how to" The biggest obstacle to mounting an S-10
rotor on a Chevette spindle is the difference in wheel bearing and seal I.D. the S-10
bearings and seal are quite a bit bigger so spacer sleeves have to be machined. I started
with 1/2" pipe for the outer bearing sleeve, 1"pipe for the inner sleeve, and
2" o.d. thick-wall tubing for the seal sleeve. I Ieft a small flange on the inner end
of the sleeve for the inner bearing so it couldn't slip through the bearing and fall into
the hub. The seal ring requires a 1/4" radius on the inside to clear the chamfer on
the inside of the spindle shaft. Once the sleeves and the rotor assembly were set on the
spindle I found that the S-10 hub is about 1/4" longer than the Chevette. I coped
with this by cutting the slots in the castle nut about 1/8" deeper and installing it
without the washer. ( I suppose you could drill another cotter pin hole closer to the end
of the spindle instead) Once the rotor was mounted on the spindle, I put new pads in
the caliper and clamped it to the rotor positioning it so it would clear the control
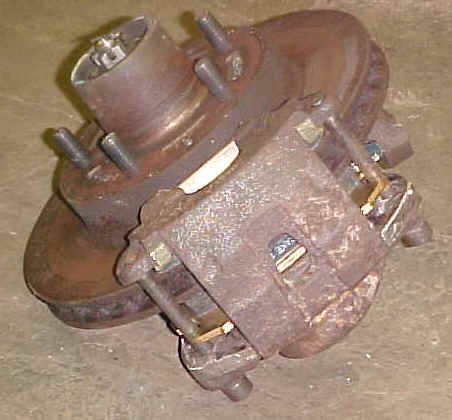
arms when the wheels are turned. Next I made a cardboard template for the caliper brackets
and cut them out of 3/8" steel plate. (1/2" is best, but I have seen 1/4"
used- 3/8" is what I had on hand) 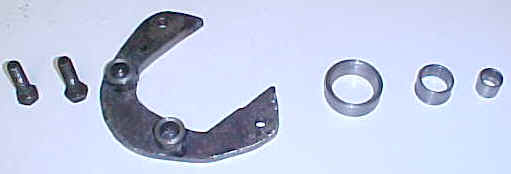 The caliper brackets bolt on to the spindle at the
same mounting holes for the stock caliper bracket but require spacers about 5/8" long
(I used thick-wall tubing but washers would work) and longer bolts. The stock mounting
bolts are an oddball metric thread so rather than try to find longer bolts with the same
thread I tapped the spindle to 1/2x20 (SAE) and used 1/2"x 1-3/4" bolts.
The last step was to drill and tap the brackets at the outer ends for the S-10 caliper
retainer bolts (7/16 SAE) This is as far as I went. To complete the swap all you would
have to do is install the brake hoses, bleed the brakes and mount the wheels and tires.
I wish I had thought of this when I did the brake conversion on my 86 S. Even
though I have about 20 hrs invested it is still much easier than changing the entire
spindle. If you had the parts that I fabricated on hand this swap could be done in
about 2-3 hrs. Making these parts is another story. The tools I used were a lathe, dial
caliper, cutting torch, sawzall, grinders, drill press and taps. Ed
The caliper brackets bolt on to the spindle at the
same mounting holes for the stock caliper bracket but require spacers about 5/8" long
(I used thick-wall tubing but washers would work) and longer bolts. The stock mounting
bolts are an oddball metric thread so rather than try to find longer bolts with the same
thread I tapped the spindle to 1/2x20 (SAE) and used 1/2"x 1-3/4" bolts.
The last step was to drill and tap the brackets at the outer ends for the S-10 caliper
retainer bolts (7/16 SAE) This is as far as I went. To complete the swap all you would
have to do is install the brake hoses, bleed the brakes and mount the wheels and tires.
I wish I had thought of this when I did the brake conversion on my 86 S. Even
though I have about 20 hrs invested it is still much easier than changing the entire
spindle. If you had the parts that I fabricated on hand this swap could be done in
about 2-3 hrs. Making these parts is another story. The tools I used were a lathe, dial
caliper, cutting torch, sawzall, grinders, drill press and taps. Ed
Oct 23, 2002 addition:
Hi Bob: I spent the day yesterday shopping for the parts and materials to make up 10 sets of brake adapter kits. The flame cut plates will be ready next friday and the metric bolts will be in next wednesday. I got eveything else. I also stopped at the local U-pull it and got a set of rotors and calipers from an 85 GMC S-15 to mount on the 84 Chevette CL test mule. I worked on the setup for about 3 hrs last night and about 6 hrs today. It's complete except for bleeding the brakes and mounting 5 bolt wheels and tires. By modifying the calipers slightly and mounting them upside down I was able to connect the stock Chevette brake hose. This will mean bleeding the calipers off the car but should cause no other problems. Clearance between the calipers and the control arms turned out not to be a problem- the front steering stop on the opposite side stops the spindles before the calipers hit, which means I'm getting full travel on the steering. I plan to have the brakes bled and the car on the ground tomorrow morning to begin testing the brakes, and to have the rest of the parts machined by the end of next week. I plan to assemble each kit on the test car to insure that everything fits and works properly which will take a few days so they should be ready to ship by the end of the month. I thought I had sent you pics of the prototype setup that I did a few months ago but re our phone conversation I guess I didn't. I'll include them here. I have started working on an ad but I'm going to wait until I have a firm price figure worked out before I post anything on the net.