
Bob's Diesel Chevette timing belt advice and additions
Although I consider the advice on the previous pages to be exemplary, and nearly complete, there is always room for additions, especially for first timers ! There were a few things that I didn't know on my "first" job that cost me some time and consternation. However, this was mainly because I didn't understand my instructions completely without pictures. (Or maybe because I wasn't sent my instructions in crayons, I'm not sure. J )
Please read all of the information provided by the people concerning timing belt installation. Once that is done, there will be no room for error, and the job should go smoothly. If you have the GM Shop Manual, that may offer additional assistance, but it's certainly not required after you read these pages. As always, the authors assume NO LIABILITY for any mistakes that the reader may make.
Captain Moore's method, in my opinion, is probably the best way to go. Dr. Sean and Mr. Venus also offer valuable advice. If using Dr. Seans method, keep in mind that you really won't know if your cam is in the CORRECT position. ( I'll get to this precisely later. ) However, if your car was running fine previously, there is no reason to believe that the cam is out of time. ( But is it really running fine ? I thought mine was.... ) Shawn Begin has performed a couple of belt jobs, and both times his cams were in alignment when checked with the tool, as was one of my cars.
I'm not going to go into precise detail about the entire procedure, I'm merely going to be adding my own experience here, which will completely remove any apprehension about performing this simple job. Probably the most important thing to do is to decide to GET IT DONE. It is important that the belt be changed, as serious engine damage will occur, probably ruining the engine, if the belt does fail. This job will take anywhere from 2-5 hours, ( unless you're Shawn J ) depending on the ability of the mechanic, and this assumes that you will be taking your time, as there is no real reason to hurry and make a mistake. This is not the kind of job that you want to make a mistake in.
First, since it hasn't been mentioned before by anyone, you're going to need a 10mm Allen head tool. I didn't have one, and had to make a run to the parts store. I suggest getting a socket tool as shown, 3/8" or ½" drive. The ½" drive would probably be preferred, as your going to have to do some 'crankin !
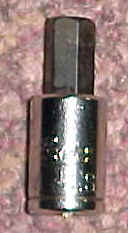

10 mm Allen tool
Diesel Cam fixing plate ( 3/16" stock, grind in this area ^^^^^^^ )
You're going to need to make a Diesel Chevette cam fixing plate. It's simply a piece of VERY HARD steel, 1" wide, "about" 4" to 7" long ( length is not critical ) and 3/16" thick. You will need to grind a couple of thousandths off the steel in the area shown above. In a pinch, you could probably use about anything you can get your hands on, a rat tail file for example. But I would urge you to make or get this tool before beginning. I will explain why later. What you see above is a special hard wrench handle that is exactly 3/16" thick, and cut down to fit for length, and ground on in the area shown.
Remember, what you are about to read below is only additions to the fine advice provided by the experts.
Now, on to the show !
You can leave the radiator in place, but I recommend a piece of cardboard to protect it. You only need to drain a little over a gallon out of the radiator. That will be sufficient.
Go ahead and take the throttle cable off.........
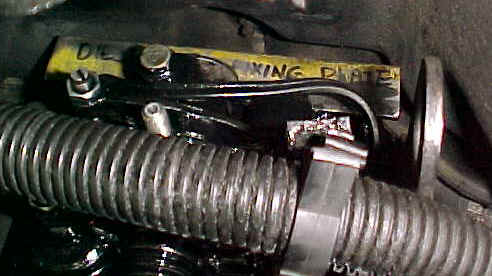
........and lay it out of the way. Get the heater hose out of the way also. Don't worry, you have drained enough water to not make a mess. Note that this '81 Diesel Chevette has a "T" in the upper heater hose line. The other year cars do not have this. The wiring harness is in the way, but not a problem to hold up with one hand while you remove the cam cover with the other. Try to keep the cam cover gasket in the cover. It will probably be re-useable. It's rubber. ( Someone had "glued" this cam cover gasket down to the head, and it had to be replaced. I was prepared, and had a new gasket handy. You can still see it stuck to the head in this picture. )
 This
is the timing mark, as shown from the bottom. It is straight down,
completely at the bottom of the engine, you can't miss it. Don't confuse it with the
similar timing cover alignment pin on the passenger side ! Note that this is shown lined
up perfectly with the mark on the balancer. If you look carefully, you will see three
marks about a ½" left from the TDC mark. Now there are some other marks on the
balancer as well, which you can ignore. Familiarize yourself with these marks !
This
is the timing mark, as shown from the bottom. It is straight down,
completely at the bottom of the engine, you can't miss it. Don't confuse it with the
similar timing cover alignment pin on the passenger side ! Note that this is shown lined
up perfectly with the mark on the balancer. If you look carefully, you will see three
marks about a ½" left from the TDC mark. Now there are some other marks on the
balancer as well, which you can ignore. Familiarize yourself with these marks !
Important ! The top cover and bottom cover share a bolt on the lower passenger side ! Neither of my cars had the correct bolt. I had to go get a new bolt the correct length, about 1½" long. Like Dr. Sean writes, note where the long and short bolts go. You may break some off, I know I did, and I was careful. Fortunately, there are plenty holding the timing belt cover on. The short bolts go into the top cover, into the bottom cover. Be careful not to "turn" the inserts in the plastic cover !
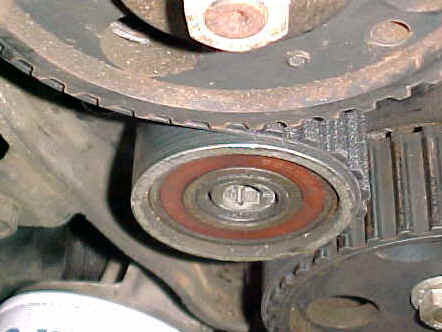 This
is your tensioner pulley that will require the 10 mm Allen bolt tool. This thing is tight
! Be prepared to strain to loosen this one. Matter of fact, I suggest smacking the handle
to knock it loose. Don't worry, it's regular thread, not reversed. But is is tight ! Check
Captain Jimmies torque specs. There are two other 12mm bolts also. No problem.
This
is your tensioner pulley that will require the 10 mm Allen bolt tool. This thing is tight
! Be prepared to strain to loosen this one. Matter of fact, I suggest smacking the handle
to knock it loose. Don't worry, it's regular thread, not reversed. But is is tight ! Check
Captain Jimmies torque specs. There are two other 12mm bolts also. No problem.
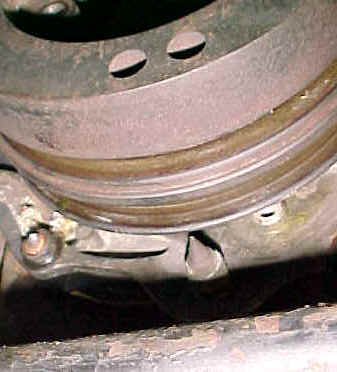
This is the tension spring BEHIND the plate area where you are working.
Familiarize yourself with this thing. After you do it once, it's pretty simple. I
used fingers, and a screwdriver, to pry it loose so I could move it out of the way. Same
installation procedure. The "leaf" spring needs to be pried back away from the
top pin, and moved rearward to clear it. It will then be free.
The upper right pulley is the cam gear. That bolt in the center takes a 17MM
socket. The cam fixing plate must be in place so you can "knock it loose",
as it is very tight. Regular right hand threads. ( I wish I had been assured of this
before I started MY jobs ! On the tensioner pulley too. ) I suggest loosening the bolt a
couple of turns ( after you get the thing loose ), then lightly tap the pulley with a
hammer. This will release the pulley (cam gear) from the cam shaft, allowing you to turn
the pulley, easily facilitating installation of the timing belt. The pulley is on a
conical shaft, so it will come loose easily. It needs to be very tight of course in final
assembly, which is why you need that cam fixing plate again. You will be tightening the
pulley against that cam fixing plate bar, which is preventing the cam from turning, as
well as positively locating it.
( Note: I suggest using the cam fixing plate, and loosening the cam pulley to be sure that your camshaft is perfectly aligned with your injection pump and crank. One of my cars was way off, { a ¼" on the crank } from a previous timing belt installation, and I would have never found that without the cam fixing plate ! I picked up some noticeable power from repairing that, and a valve adjustment. )
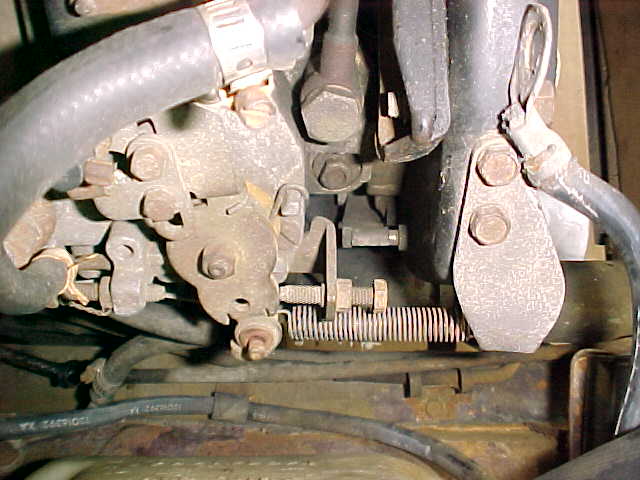
This is a shot of the cam fixing plate holding the camshaft in place. It is at the
rear of the head. The plate fits into a slot in the cam, and simply lays across the head
cam cover mounting surface. Easy.
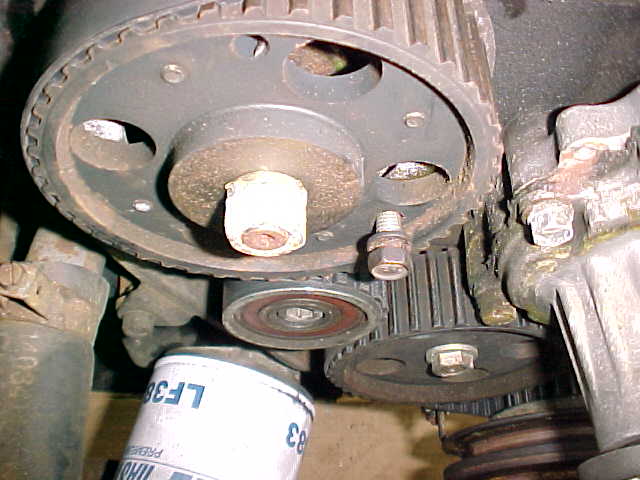
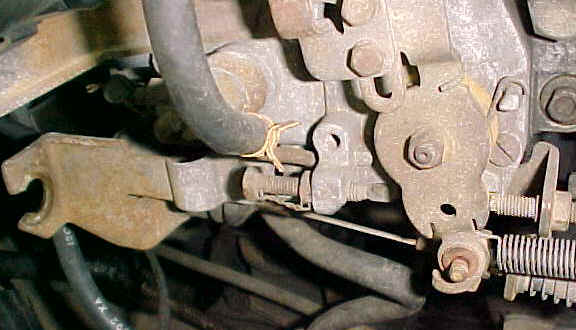
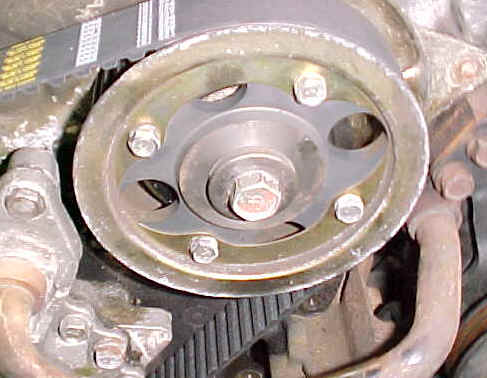
A shot of the injector pump gear being held in place with one of the harmonic
balancer bolts. Perfect fit. Note the timing mark at the upper left.
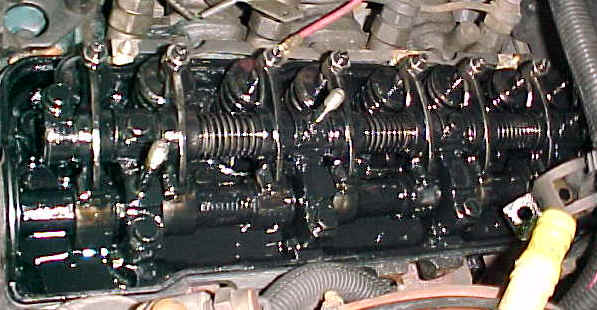
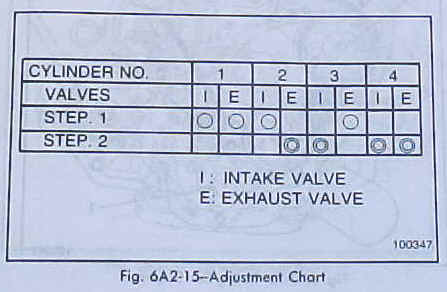
While you're at it, adjust those valves ! Only takes a couple of minutes. And
besides, while the engine is at TDC, you can do four of them, then when you turn the
engine over BY HAND one complete revolution, you can do the other four. Use the
chart below to see which valves to adjust. The top step one is at TDC ( No 1 ), and when
you turn the engine 360°, you can adjust step 2, which will be No 4 TDC.
Intake: .010 Exhaust: .014
If you're at this stage, the belt is installed, tensioned correctly, you have
turned the engine over a couple of times, and absolutely verified that everything,
injector pump bolt, cam plate, and crank are in time, you're just about done. Did you
adjust the valves ? ( Gee, that engine looks like a Heavy Duty Industrial Truck
engine, doesn't it ? )
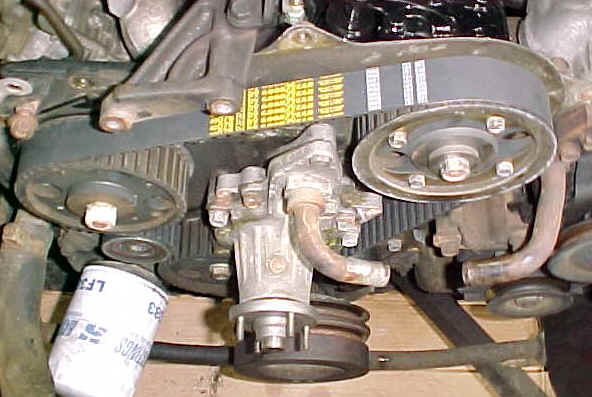
Now, here's a trick I would like to contribute. When I put the alternator and power steering belts back on, I didn't loosen the alternator, or power steering pump ! I was able to work the fan pulley back onto the water pump with the belt in place, ( not easy, but only took a minute ) and didn't have to fool with the alternator. If you have ever moved the alternator, only to find your vacuum pump oil line starting to leak, you will learn to avoid that if possible. Do you have power steering ?
You can do the same thing here. Matter of fact, it's really very easy with this
pulley bracket to line up the power steering pump idler pulley, and bolt it on. I would
imagine most of you won't have power steering, but it's handy to know this if you do.
Lube the timing belt cover bolts before you install them, the ones that didn't break off, and button it up ! Now, that wasn't so bad, was it ?
Remember, this page is not instructions on how to install the timing belt, merely my own additions and observations which *may* assist the fledgling Diesel Mechanic.
I was lucky. I put off changing my belts for too long, but didn't suffer from it. I think the belts are very tough, and probably not fragile, at least from the two that I removed. But, if one does break, it's virtually over. I have gotten email over the years from individuals looking for parts because their belts have broken, but every time I urged them to contact me back if they got their vehicle back in operation, I don't *think* anyone ever did. I know valve's can be bent, rockers destroyed, the rocker arm shaft destroyed, the mounts, etc. Don't let this happen to you. Your incredibly rare World's Rarest Collector Car deserves better.